
- Epic Minecraft Treehouse Ideas - March 19, 2022
- Minecraft Protection Guide - March 19, 2022
- Minecraft Impaling Guide - March 16, 2022
The stonecutter in Minecraft is useful for crafting stone-related blocks in precise and smaller quantities than when used with a crafting table. You’ll probably get up to a lot of stonework in Minecraft because there uses are plenty, and stone is found all over the place.
What’s so great about the stonecutter is that you only need one resource at a time, and most of the things you’ll craft take little prep time or aren’t difficult to find. Unless you’re going to the treacherous Nether, but even so, Nether Bricks can be found, mined, and taken back to the Overworld. Just be sure to bring some armor!
Before you can use a stonecutter, you need to craft one first. Before you even start looking at the stonecutter, you need to figure out how to make plenty of other objects such as the pickaxe, crafting table, and furnace.

In this article, we’ll walk you through the entire process of finding the objects necessary for crafting, to using crafting objects, to finally making your stonecutter.
Let’s start this adventure by figuring out if you can even make the stonecutter in your game version!
Does My Version Support Stonecutters?
Not all versions will allow you to craft stonecutters because it wasn’t included in the base version. Out of the 10 versions out as of currently writing this, only three versions won’t support stonecutters. All versions that lack support are on older generation hardware.
| Platform | Support (Version Number) |
| Education Edition | Yes |
| Java Edition (PC/Mac) | Yes (1.14) |
| Nintendo Switch | Yes (1.5.0) |
| Nintendo Wii U | No |
| Pocket Edition (PE) | Yes |
| PS3 | No |
| PS4 | Yes (1.91) |
| Windows 10 Edition | Yes |
| Xbox 360 | No |
| Xbox One | Yes (1.2) |
As the newer generation of consoles continues to release Minecraft, they will also contain the stonecutter. Xbox Series X/S and PlayStation 5 are guaranteed to have this item.
What Version Number Was the Stonecutter Released On?
The stonecutter was exclusive to the Pocket Edition of Minecraft but was redesigned and added to the Java Edition during its 1.14 update. Since then, the stonecutter appeared in the Xbox One 1.2 update, the Nintendo Switch 1.5.0 update, and finally, the PS4 1.91 update. The stonecutter became prepackaged with every other version after.
In the Nintendo 3DS version, the stonecutter was also included but unusable. It was available in the creative inventory as a decorative item.
How to Craft a Stonecutter in Minecraft
Time to gather materials and craft: 5-10 minutes
To create a stonecutter in Minecraft, you’ll need one (1) iron ingot and three (3) stone blocks. While that sounds easy, you can’t just settle for regular ol’ cobblestone. You’ll need to search for the real deal, which you’ll need to craft.
Part 1: Obtain Iron Ore

Iron ore is a mineral block that is found underground. You can smelt it to turn this material into iron ingots which are the main component to make armor and tools. You’ll likely use this material to craft your first pickaxe unless you chose wood or stone instead. However, iron is more durable and will last longer compared to wood or stone.
How Rare is Iron Ore?
Iron ore generates naturally in the Overworld and forms mineral veins. It’s unlikely you’ll find just one block at a time. Keep digging around the area to reveal more as iron ore will try to generate 20 times per chine in veins of size 1-14, from levels 0 to 63. However, Java Edition after 1.16.4 can create an average of 112 ores per chunk – not bad!
You’ll need to start mining underground. It’s rare to find mineral ore when it’s exposed to the light of the Overworld, though it does occur.
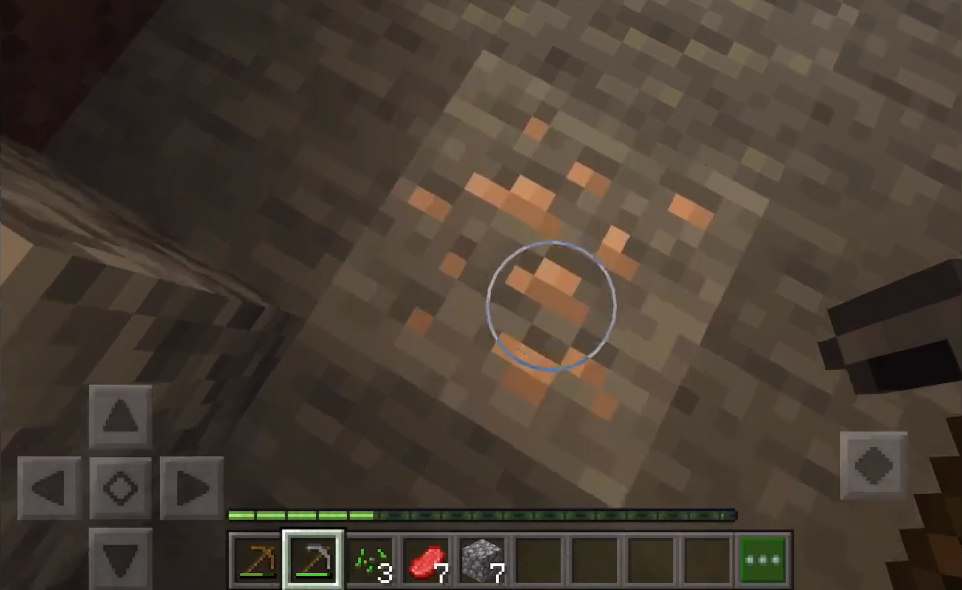
What does Iron Ore Look Like?
Iron ore will be embedded in stone blocked colored grey. Inside the blocks will be tiny specs of beige. Deepslate iron ore, which is harder and found in the deep slate layer below y=0 and works similarly to regular iron ore, it’s just more durable.
You do not need deep slate iron ore to create a stonecutter unless you want an item that doesn’t break as easily. That may be useful in the Nether.
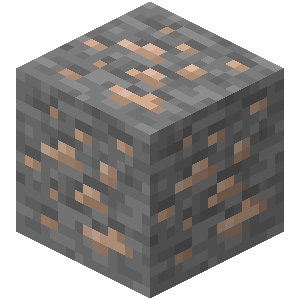

Iron Ore, Deepslate Iron Ore
How to Make a Pickaxe to Mine Iron Ore
You’ll need a crafting table to create a stone pickaxe in Minecraft (see part 2), 3 cobblestones, and 2 sticks. To make 2 sticks, you need 2 wooden planks (see part 2).
Obtaining cobblestone is easy; simply dig with your hands into the ground until you see blocks that are grey and look like interlocking stones. 3 Blackstone will also work but are harder to find.

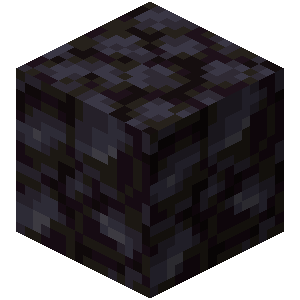
Cobblestone, Blackstone
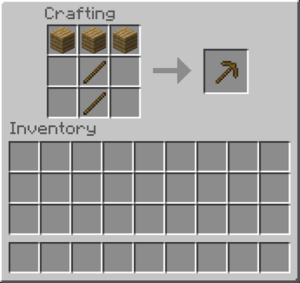
Below is the recipe for both the pickaxe and the sticks. You must assemble them in the order shown, or you won’t create the pickaxe – the order is very important!

How to Mine Iron Ore
Iron ore can be obtained with a stone, iron, diamond, or Netherite pickaxe but will break if using your hands or a wooden or golden pickaxe. You do not have to use Silk Touch to mine iron ore.
The following table assumes your tools are unenchanted, you’re not underwater, and are currently unaffected by status effects. If you are, breaking speed will be slower.
|
Block |
Iron Ore | Deepslate Iron Ore |
| Tool Used | At Least Stone Pickaxe | At Least Stone Pickaxe |
| Hardness | 3 | 4.5 |
|
Breaking Time |
||
| Hands (No Tools) | Very Slow (Breaks) | Very Slow (Breaks) |
| Wooden | Slow (Breaks) | Slow (Breaks) |
| Stone | Fast (Obtainable) | Fast (Obtainable) |
| Iron | Very Fast (Obtainable) | Very Fast (Obtainable) |
| Diamond | Almost Instant (Obtainable) | Almost Instant (Obtainable) |
| Netherite | Almost Instant (Obtainable) | Almost Instant (Obtainable) |
| Gold | Fast (Breaks) | Fast (Breaks) |
How to Mine with a Pickaxe
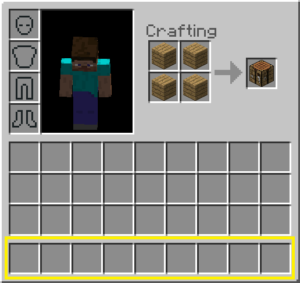
First, select the pickaxe from your inventory. To open up your inventory using the default buttons, press the E button on the Windows, PC, and Mac editions, triangle on PlayStation consoles, Y on the Xbox 360 and Xbox One, X on the Wii U, and Nintendo Switch. Press the ••• icon for mobile devices. Once there, your inventory will look like this:
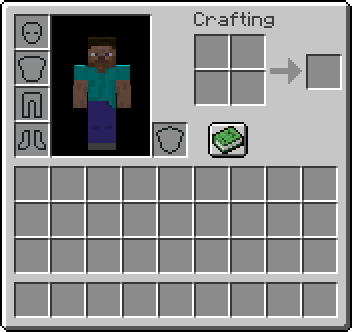
Grab the pickaxe in your inventory by left-clicking on computers. For consoles, move the D-pad or analog stick to your item of choice and select it with either X on PlayStation consoles, A on Xbox consoles, and the A button on Nintendo consoles. On mobile devices, double-tap the item with your finger.
Now that you’re holding the item exit the inventory. Use ESC on computers. For consoles, use B on Xbox or Nintendo consoles, and circle on PlayStation consoles. On mobile devices, select the X button with your finger. You should see your character holding the pickaxe on the right hand of the screen.
Mining also depends on the version of Minecraft you’re using:
- Education Edition: Left click and hold on the block of iron ore.
- Java Edition (PC/Mac): Left click and hold on the block of iron ore.
- Nintendo Switch: Press and hold the ZR button on the controller.
- Nintendo Wii U: Press and hold the ZR button on the gamepad.
- Pocket Edition (PE): Tap and hold on the block of iron ore.
- PlayStation: Press and hold the R2 button on the PS controller.
- Windows 10 Edition: Left click and hold on the block of iron ore.
- Xbox: Press and hold the RT button on the Xbox controller.
After mining, you’ll see iron ore floating on the ground. To pick it up, simply walk towards it. When you open up your inventory again, you’ll see it.
How Many Iron Ore Do I Need?
You only need one iron ore and any piece of fuel to craft iron ingots. There are plenty of objects you can use as fuel, but we’ll use wood for our purpose because it’s the most versatile. However, you can use coal if you have some lying around.
Part 2: Create a Crafting Table
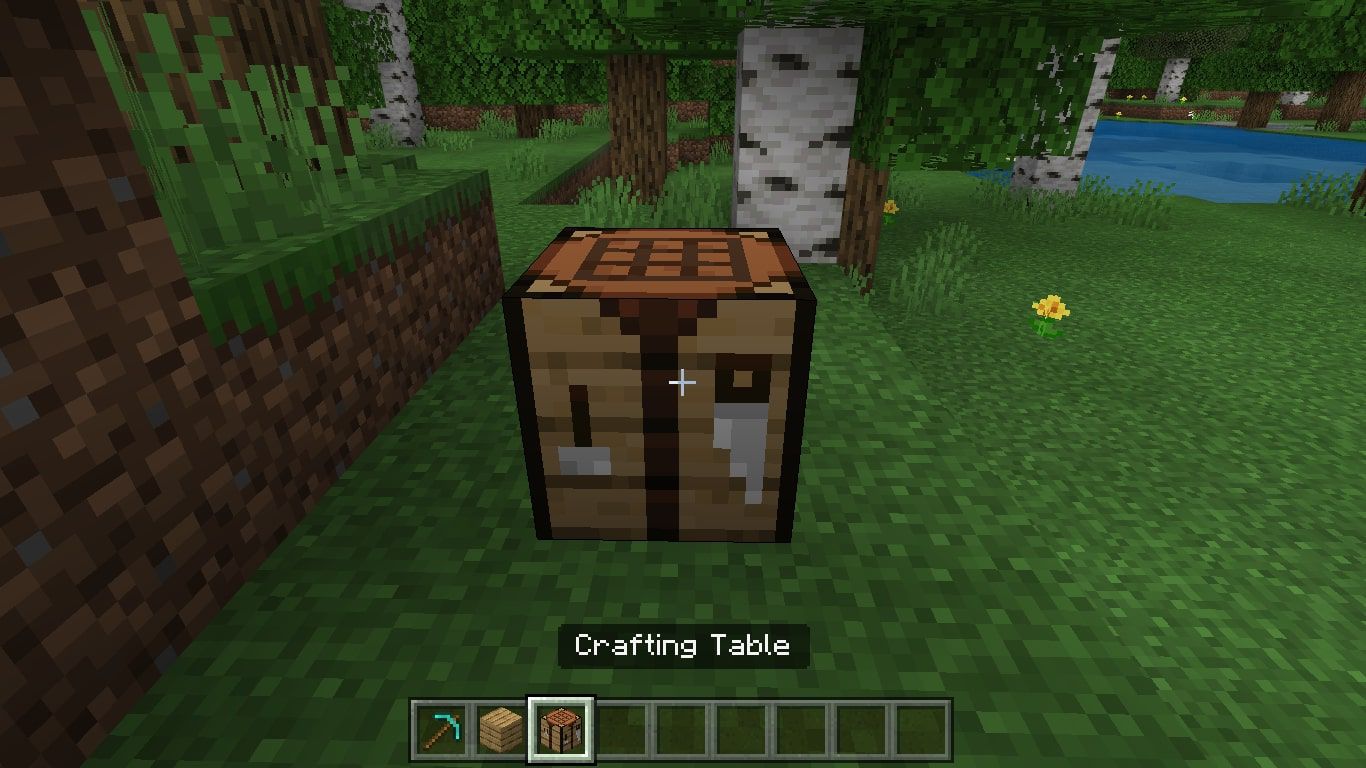
Now that you have your iron, you need to craft an iron ingot. The first thing you need is a crafting table, which is easy to make and available in all Minecraft versions.
*Note, you’ll need a crafting table to make a pickaxe in the first part.
How to Find Wood
To craft a crafting table, you’ll need 4 pieces of wood planks. Either of the following wood plank blocks will be able to create a crafting table:
- 4 Oak Planks
- 4 Spruce Planks
- 4 Birch Planks
- 4 Jungle Planks
- 4 Acacia Planks
- 4 Dark Oak Planks
- 4 Crimson Planks
- 4 Warped Planks
You will run into Oak, Spruce, Birch, and Jungle planks quickly, but the rest will be difficult to find at the beginning of the game unless you use a mod. When you mine a tree, you don’t receive planks, just regular wood. You need to craft wood to make wood planks.
How to Mine Wood for Wood Planks
You only need one piece of wood to create 4 wood planks. You may or may not have an ax to chop down a tree at this stage of the game. To make an ax, you already need a crafting table, so for now, use your bare hands to collect wood from the tree.
To do so, ensure you have nothing equipped and face the tree of your choice. Then, use the following directions depending on your version of Minecraft:
- Education Edition: Left click and hold on the tree.
- Java Edition (PC/Mac): Left click and hold on the tree.
- Nintendo Switch: Press and hold the ZR button on the controller.
- Nintendo Wii U: Press and hold the ZR button on the gamepad.
- Pocket Edition (PE): Tap and hold on to the tree.
- PlayStation: Press and hold the R2 button on the PS controller.
- Windows 10 Edition: Left click and hold on the tree.
- Xbox: Press and hold the RT button on the Xbox controller.
Similar to mining the iron ore, collect the floating items to collect them.
How to Craft Wood Planks
Crafting a wood plank requires one piece of wood. You can use your 2×2 crafting table from your main menu. To learn how to open your menu and drag objects, see the “How to Mine With A Pickaxe” section. You don’t need to set up the crafting grid a specific way.
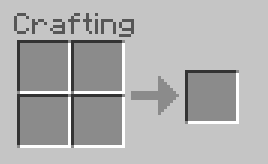

Now that you have wood planks, you can finally create a crafting table.
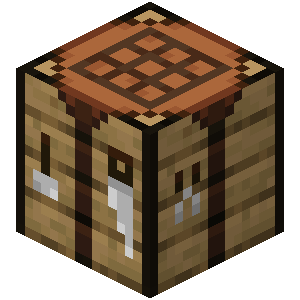
Recipe Needed to Create a Crafting Table
To make a crafting table, take all four of your blocks and place one of each in the shown boxes. A crafting table will appear in your character’s hand on the inventory screen after you do this. When you exit the screen, you should see the crafting table in your character’s right hand.
If you’re using a crafting table to make another crafting table, you’ll have to cluster the 4 wood planks together in the same way.

Finally, place it on the ground and select it. If you don’t know how to do this, continue reading.
How to Place the Crafting Table Down and Use It
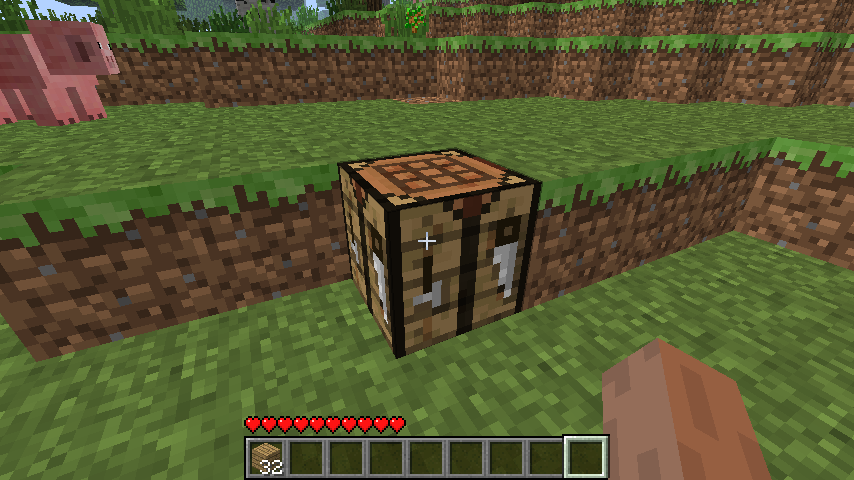
To place an item on the ground you need to put it in your inventory first. Follow the same instructions as you would select a pickaxe from your inventory but instead, place it in the lower quadrant on your inventory screen.
If you have nothing in your inventory, items you pick up will automatically show there. However, crafted items will not. You’ll need to place them in either your backpack inventory or hand inventory yourself using the instructions in “How to Mine With a Pickaxe.”
Once you have the crafting table in your hand inventory, you can exit the inventory screen. You’ll need to select the item on the Overworld screen by using the D-pad, analog stick, mouse, or your finger. Now, highlight where you want to place your crafting table and select:
- Education Edition: Right-click on the block.
- Java Edition (PC/Mac): Right-click on the block.
- Nintendo Switch: Press the ZL button on the controller.
- Nintendo Wii U: Press the ZR button on the gamepad.
- Pocket Edition (PE): Tap the block.
- PlayStation: Press the L2 button on the PS controller.
- Windows 10 Edition: Right-click on the block.
- Xbox: Press the LT button on the Xbox controller.
Now that the crafting table is placed, you can select it using the same button you used to place the block down. If you want to pick up the crafting table and move it, mine it with your free hand or pickaxe, walk into the floating object, and start the process again.
When you select the crafting table, a 3×3 crafting grid will appear.
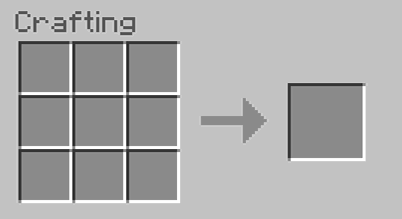
Now that you’ve opened the menu, you can start crafting a furnace!
Part 3: Create a Furnace

You’ll need a furnace to create iron ingots. To make a furnace, you’ll need 8 cobblestones or 8 black stones, but cobblestone is easier to obtain. You may even have some leftovers from when you created your pickaxe. If not, mine down from almost any location on the map to collect more.
Once you have your cobblestone, open your crafting table by selecting it. Then, place your cobblestone in every spot on the 3×3 grid except the middle. Your grid should look like this:

Then, move your furnace into your inventory. It’s a good idea to place your furnace next to your crafting table to quickly move between the two. To learn how to select objects and place them down, go to the “How to Place the Crafting Table Down and Use It.” Check out how to make saddle to get around more quickly.
Part 4: Create an Iron Ingot
The most common way to make iron ingots is by smelting iron ore. You’ll only need one iron ingot to craft a stonecutter and one piece of fuel, which can be either a piece of coal or wood. We’ll use wood because you likely have some leftover from making your pickaxe.
To open up the furnace grid, select the furnace. You’ll be presented with this gird:

You can only place one item in each box on the left. On the bottom left spot, put your fuel (in this case, wood), and in the top left box, you would place iron. You can make as many iron ingots as you like. The time it takes to smelt an iron will stay the same.
Unlike crafting tables, furnaces require 30 seconds to smelt successfully. Some items can take longer, but fully smelted iron ingots take less than a minute.
Your crafting grid should look similar to this after 1 minute of smelting. Feel free to walk away and do something else while you’re waiting for the iron ingot to cook.
Part 5: Find or Make Stone
Stone, not cobblestone, may be challenging to come across depending on your world. Even if you find the stuff, you won’t be able to obtain it with just a pickaxe unless it has Silk Touch. If it doesn’t, you’ll receive regular cobblestone.
Don’t bother finding a way to enchant your pickaxe with Silk Touch because that will take too much of your time. Instead, use your leftover cobblestone and place it inside your furnace. Wait 30 seconds, and you’ll have a stone block. You’ll need a total of 3 to make a stonecutter.

You don’t have to use fuel to create stone from cobblestone. In fact, I would recommend it to save on your resources. Once you make 3 stone blocks, you can end the smelting process. Put the stone and iron ingot in your inventory.
Now the moment you’ve been waiting for: creating the stonecutter!
Part 6: Create the Stonecutter

We’ve got all the pieces we need to craft your very own stonecutter. You’ll need to use the crafting table to take advantage of the 3×3 grid because you can’t make a stonecutter with a 2×2 grid alone.
Open the crafting table and start with the stone. Place three stone blocks on the bottom three grids and one iron ingot on the middle grid. Then, drag or select the stonecutter into your inventory.

Once you place the item down, you can open the stonecutters’ grid. You’ll notice a full range of options to consider. Stonecutter items are made to create intricate blocks to use in your homes or other building projects.

On the leftmost segment, you can place any type of stone:
- Stone
- Smooth Stone
- Stone Bricks
- Mossy Stone Bricks
- Granite
- Polished Granite
- Diorite
- Polished Diorite
- Andesite
- Polished Andesite
- Cobblestone
- Mossy Cobblestone
- Sandstone
- Cut Sandstone
- Red Sandstone
- Cut Red Sandstone
- Smooth Red Sandstone
- Prismarine
- Prismarine Bricks
- Dark Prismarine
- Block of Quartz
- Purpur Block
- Bricks
- Nether Bricks
- Red Nether Bricks
- Basalt
- End Stone
- End Stone Bricks
- Blackstone
- Polished Blackstone
While you can’t make everything with every piece of stone or stone-like object, you can slabs, stairs, bricks, brick slabs, brick stairs, brick walls, and chiseled stone bricks from the stonecutter crafting menu. Regular stone and black stone are the most versatile materials.
How to Use the Stonecutter

Using the stonecutter is simpler than using the crafting table or the furnace because you only need one resource to craft every single item in the stonecutter list. Slabs and brick slabs will produce 2 of their kind with one block, but the rest will only make 1 item per 1 block.
When looking at the stonecutter crafting menu, select from the available yellow blocks shown in the middle segment. Once you click, the made block will be shown on the rightmost segment. Simply drag the item into your inventory when you’re done.
Here is an example of how you would make stairs with a stone block:
As you can see, one of the yellow objects no longer lights up because it’s selected. Creating items with the stonecutter is instantaneous, so you don’t have to wait for anything to cook. To make multiple items at once, you’ll need to select the item you want in the middle segment more than once.
You can create plenty of interesting structures with the stone cutter, so try it out for yourself in your own Minecraft world!
Frequently Asked Questions
Question: Can you Find a Stonecutter Instead of Making One?
Answer: It’s possible to stumble upon a stonecutter in the wild – if you’re lucky enough. Stonemason houses do pop up in villages and are usable by your character. Villages spawn naturally in the desert, plains, savanna, snowy tundra, and taiga biomes. They also have a chance to spawn in snowy taiga hills, snowy taiga, sunflower plains, and taiga hills in the Bedrock Edition.
You’ll have a greater possibility of a stonecutter home spawning if the number of beds that appear in the village is high, as villagers only spawn in homes with a bed. If you stumble upon an Abandoned Village, a stonecutter could still be in one of the houses.
Question: Can you Make Stonecutter Items Without a Stonecutter?
Answer: Yes and no. The purpose of the stone cutter is to make more intricate items than you otherwise could if you crafted the same thing. For example, you can make stone slabs with a crafting table using 3 stone blocks, but you won’t get the stone-like pattern without the stonecutter. You also can’t make stone bricks, stone brick stairs, stone brick walls, or chiseled stone bricks with a crafting table.
In the example above, the final product doesn’t have stone bricks around it. To make the most beautiful, unique, and exciting buildings, you may need a stone cutter to accomplish the look you want. Otherwise, you can make simple stairs and slabs.
Question: What is an Old Stonecutter, and How do you Get it?
Answer: Old stonecutters were created in Minecraft before they became usable stonecutters. They look entirely different from current stonecutters as they’re in the shape of a complete block, have a saw-like-cutter on the side and top, and are purely decorative. Old stonecutters are available in the creative inventory in the Nintendo 3DS version only.
If you find an old stonecutter on your adventure, you can use any pickaxe to obtain them and place them in your inventory. If you try to mine an old stonecutter with just your fist, it will break and can’t be put back into the world. It’s common for Minecraft players to find an old stonecutter, place it in their forge, and stack a new stonecutter on top.
Question: Can I Update an Older Version of my Minecraft Game to Make Stonecutters Useable?
Answer: It depends on what version of Minecraft you’re using, but all computer versions that are downloadable through Steam or another legitimate online retailer will come with an up-to-date version of the game. All up-to-date versions of the game will have the stonecutter as it’s an item that was implemented into the game early on in Minecraft’s update schedule.
However, if you have the Wii U, PS3, or Xbox 360 version of Minecraft, you won’t be able to update it to receive the stonecutter. It’s recommended you purchase a newer copy of the game if you want to play on the console. All other versions of the game will be compatible with the stonecutter, including the PlayStation 5 and Xbox Series X/S.
Further Read:
- Minecraft Flying Guide [2022]: How To Master Elytra, The Best Mods and More!
- How to Make Minecraft Cartography Table
- How to Tame a Fox in Minecraft: All You Need To Know!
Conclusion
Getting a stonecutter in Minecraft isn’t difficult as long as you have a passing knowledge of the game. If you don’t, no problem! We had you covered from the moment you mined your first tree, then getting your first pickaxe, your furnace and crafting table, and finally, your stonecutter.
Stonecutters aren’t the only way you can craft interesting stone objects. You can still make stairs and slabs on the crafting table – they just won’t look as good. That’s the whole point of obtaining a stonecutter – to make something more interesting than crafting a table ever could!
Have fun creating tones of beautiful stone pieces for your Minecraft world!