- Epic Minecraft Treehouse Ideas - March 19, 2022
- Minecraft Protection Guide - March 19, 2022
- Minecraft Impaling Guide - March 16, 2022
Playing Minecraft may mean challenging yourself in creative mode to attempt the best building concepts, or trying to survive mobs–but knowing how to make a cartography table is one of the best ways to open up your gameplay to new possibilities, no matter your play style.
The importance of a cartography table, and using it to edit world maps is no more compelling than it was this past year. Unable to meet other Minecraft players in person, Minecraft players from around the world celebrated with the Minecraft Community Celebration.
The community celebration included free content involving not only character creation but also maps. Together, the event helped Minecraft players connect and celebrate their love of the game–and expand the way they play at the same time.
It was all celebrated at a time of a robust and passionate online community: Minecraft was the most-watched game in 2020.
Consider this your guide to cartography tables in Minecraft. I’ll take you through how to find a cartography table; how to male a cartography table, and how to use cartography tables for your best Minecraft gameplay experience yet.
How to make a cartography table
A cartography table can be found in villages, as it is integral to the cartographer’s job in-game. The cartographer’s place is just one of many job site blocks in Minecraft, an area of around 48 blocks where those seeking employment or the employed gather, marked also by village gossip.
Villagers who are unemployed can gain access to the cartography table by claiming the table and the profession.
Your best bet, as a player seeking to use a cartography table, is learning how to make a cartography table. This can be done by using a crafting table or station. It takes a surprising number of resources, but it’s also well worth the effort.
Gathering Resources
To make a cartography table, you’ll first need to gather all the required resources. You’ll need the following:
- 2 papers
- One of the following:
- 4 oak planks
- 4 spruce planks
- 4 birch planks
- 4 jungle planks
- 4 acacia planks
- 4 dark oak planks
- 4 crimson planks
- 4 warped planks
All of these items are essential for making a cartography table, but you can substitute wood planks. In other words, you can opt to use dark oak wood planks or 4 crimson planks. Luckily all of these resources are fairly abundant in Minecraft worlds.
Crafting Planks
To craft all the wood planks, you’ll need to first acquire logs for each kind (dark oak logs, crimson logs, etc). Logs can be gathered by chopping the appropriate trees with an axe of your choice.
Next, select a 3 by 3 grid on a crafting table and place the log of your choice in the center of the grid. Each log, conveniently, will provide 4 planks of wood, which is all you’ll need to make a cartography table in Minecraft.
Acquiring Paper
You can find paper by looking for it on shipwrecks; in fortresses or strongholds, and in villages. You can also craft paper yourself by using a 3 by 3 grid and placing 3 sugar canes in the center column.
Making the table
Now that you have all the wood planks and paper you need, it’s time to make a cartography table. In order to make a cartography table, begin with a 3 by 3 grid with the crafting table.
Next, place your materials in the following pattern. If you do not follow the pattern exactly, then you will not be successful.
- For the first row: 1 paper in box 1; 1 paper in box 2
- For the second row: 1 wood plank, followed by 1 wood plank
- For the third row: 1 wood plank, followed by 1 wood plank
Once you’ve placed the appropriate materials on the cartography table, simply place the now complete cartography into your inventory.
What is a cartography table used for?
The cartography table in Minecraft is an excellent feature that allows you to manipulate maps. Appearing as a renewable, stackable block, the cartography table is an essential tool if you want to change something about your maps, and are relatively easy to use, make and find. Here are the main uses of a cartography table in Minecraft.
Increasing Map Size
One way you can use a cartography table is to increase map size. Increasing map size can be helpful for a number of reasons. For one, it gives you more area to explore, which is ideal for making the world feel fresher.
For another, increasing map size may prove helpful if you’re struggling in survival mode. By increasing map size, you may have more room to build up and score for resources before you’re inundated by predatory mobs.
Finally, I like increasing map size to expand my creative limits when I’m building. A more expansive world can spark creativity and lead to new possibilities.
How to Increase Map Size
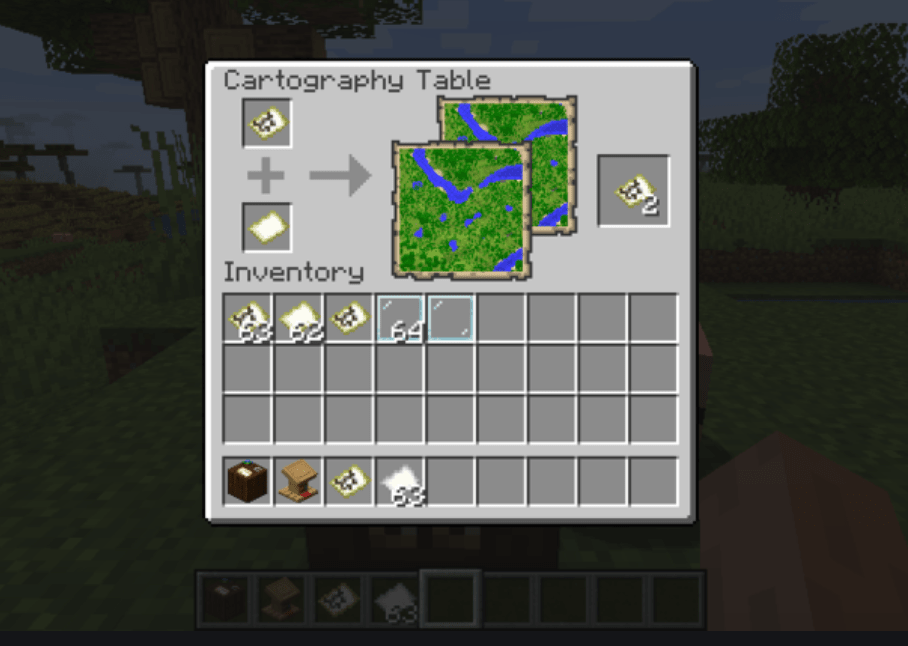
To increase map size, use your pointer to select where you want to use your cartography table. Next, set a map on the first block/ window on the table’s grid and paper in the second. Adding paper is what automatically increases your map size.
Keep in mind that there is a limit to how much you can increase a map’s size: you may add paper up to a maximum of four times in total. In order for the change to take effect, you’ll simply need to add your new, and larger map, into your inventory.
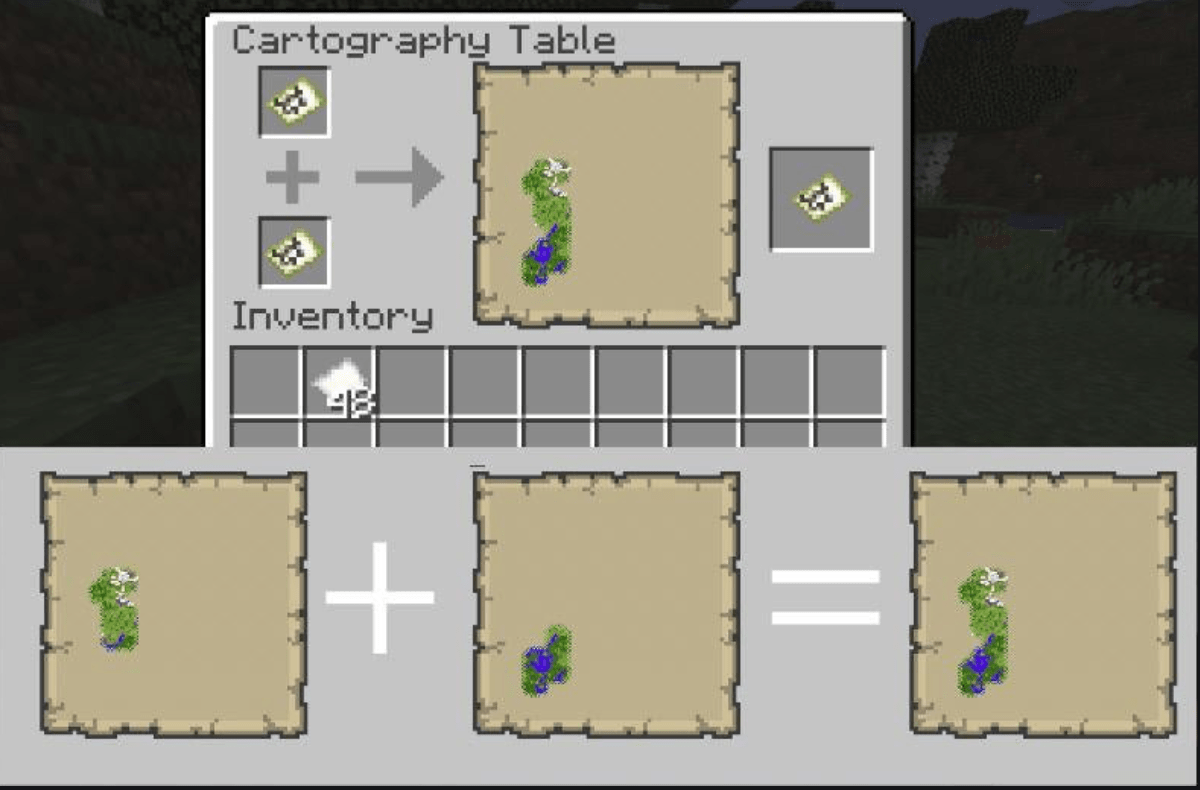
Making Map Copies
Knowing how to make a copy of a map can be useful in Minecraft if you want to make a revised version of the world, or have an original on hand for some reason. Cloning a world in Minecraft is especially helpful for creative players and acts as a security, in a way, should you feel unsatisfied with the changes you’ve made.
How to Clone/Copy Worlds
You can clone or copy worlds in Minecraft by placing the map you want to clone in the first slot of the cartography table. Next, place a blank map in the second slot of the cartography table. To retain the changes, place both the original map and its copy into your inventory.
(To create an entirely blank map, go to “create a world” then navigate to “more world options”. Next, select your desired world type, “customize” and select presets. Type a “12” into the text box and start building your map by building with blocks in creative mode.)
Locking Maps
You can also lock maps using a cartography table. A locked map ensures that the map itself will never change, regardless of what happens in your game. This is useful if you have a certain vision for your map, or want to control conditions for some reason.
How to Lock Maps
To lock a map, place a glass pane in the second slot of your cartography table (your map should go in the first slot). Doing so will lock data for that map, and it will also automatically lock data for any copies of that map.
You can solidify the changes by adding the new locked map to your inventory. To unlock a map, navigate to the gear menu and select to unlock. Glass panes can be found from windows, in both villages and mansions. You can also trade one emerald for 11 glass panes from villagers, or craft glass panes of your own using stained or regular glass.
Locating Maps
You can also use a cartography table in Minecraft to create regular and empty map locators. However, these features are limited to the Bedrock edition of Minecraft.
In the Bedrock version of Minecraft, locator maps can be used to help you explore both The End and the Overworld. The main function is to be able to visualize the surface area, as well as key features. In addition, locator maps are enormously helpful for finding other Minecraft players.
How to make Locator Maps
To make a locator map, place a compass in the center, then surround it with maps in the slots. To find a compass in Minecraft, I suggest checking with librarians in the main villages, wandering around the villages themselves, or searching chests in shipwrecks.
If you’d rather craft it yourself, you can make a compass in Minecraft by placing a Redstone dust in the center of a crafting table, then surround it with four iron ingots. Iron ingots, in turn, can be made by smelting iron in a furnace; you can also occasionally find iron ingots in dungeons, strongholds, or temples.
Using Maps in Minecraft
Now that I’ve covered how to make a cartography table; how to use a cartography table, and why a cartography table is helpful for your gameplay, here are a few considerations as to how to make full use of the maps you’ve been using or changing.
Finding/Making Maps
You can find maps, as I mentioned, in a few ways. Maps are used for exploration and also mark specific features and terrain types. Maps are sometimes found in shipwrecks, strongholds, fortresses, and parts of villages. Players can easily make maps of their own by filling a 3 by 3 grid with paper.
Working with a New Map
Once you’ve made a new map, there are, of course, options beyond the features offered by the cartography table.
Zooming in Maps
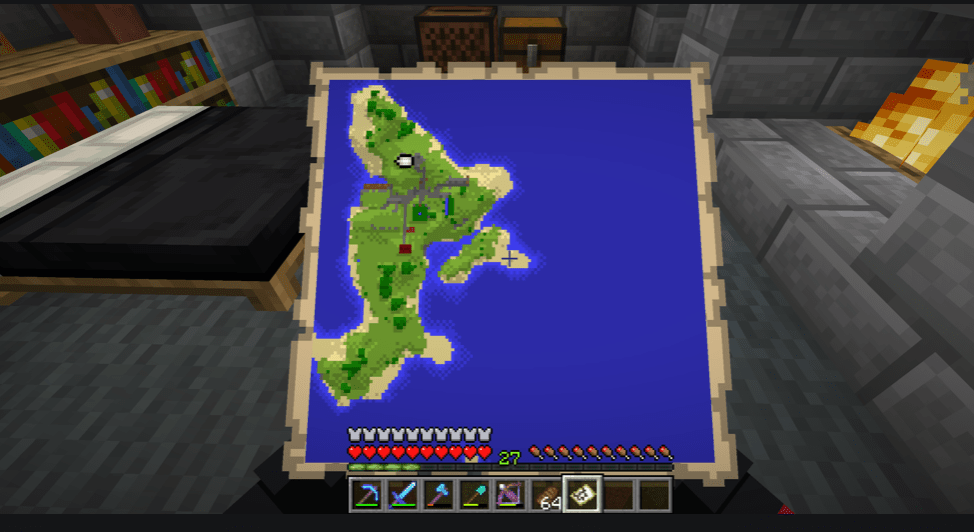
The first thing you’ll want to play with is zooming in and out. You’ll be taken to a top-down view of the map and can easily navigate using the pointer, which will show your current location.
You can zoom up to five different settings on maps, from 1 by 1 to 16 by 16 blocks. The first setting is used for both pixel art and plans. The second zoom setting is helpful for identifying general features, such as trees.
The third zoom setting allows you to distinguish buildings, and the fourth zoom setting allows you to look at rivers and mountains. The final zoom setting provides a deeper look at mountain ranges and details of the biomes.
Marking
Marking a map can be extraordinarily helpful for navigation purposes. To mark maps, you may want to experiment a little. This feature, it should be noted, is exclusive to the Java and Bedrock versions of Minecraft.
Set a map on a banner, which can be accessed in creative mode or by eliminating a patrol in survival mode. Once placed on the banner, a mark will appear on the map. This mark will take on the same color as the banner and will be situated North.
For Bedrock players, you should instead use locator maps, which provide a pointer system equitable to the banner markings provided in the Java version. For the Bedrock version, a green pointer will appear.
Other Features
Each map is divided into a grid pattern and will center on the first created grid, as opposed to your current location. The map becomes more detailed as you explore the Minecraft world. You may also see other players on the map, items, and landmarks.
One feature I find useful is the mini-map. Assuming you don’t always want the full map out, a mini-map on the side can be helpful for navigating your world.
An exception to the navigation and design maps pertaining to the Nether world. For maps related to the Nether world, the markings will be delineated in both red and grey. Compared with the reliable pointer system, the navigation for the Nether is far less accurate and may spin rapidly, adding a complication to getting around the map.
Frequently Asked Questions
Question: How do you use cartography in Minecraft?
Answer: Cartography is a useful skill in Minecraft, in which you make, edit, tweak and use maps. Using a cartography table, you can lock and unlock maps; clone/ copy maps; expand map size; zoom in and out of maps, and add markers to maps to figure out where other players and resources are located. You can even make and customize your own maps, making for a more immersive and personalized experience. In this sense, cartography is useful both for creative and survival modes in Minecraft.
Question: Do cartographers in Minecraft give different maps?
Answer: Depending on where you go, you may get different maps. Cartographers in Minecraft help you navigate different features of the Minecraft world, in that they will supply maps pertaining to the closest landmark or mansion.
To that end, if you meet different cartographers in the same region, they may all supply you with the same map. In other words, the map you receive has little to do with the cartographer so much as it pertains to the location of the cartographer.
Question: Which villager gives you the Woodland mansion map?
Answer: If you’re playing Minecraft and frustrated that you can’t find a Woodland mansion map, you may not be looking in the right places. To obtain a Woodland mansion map, you can simply buy one from Fletcher villagers.
Classified as an explorer map, or a map used to navigate specialized locations, the Woodland mansion map may be directly bought or traded for, as can maps for specialized monuments. Meanwhile, maps for buried treasure may be found via shipwrecks and underwater ruins.
Question: How do you get a villager map?
Answer: To obtain a villager map in Minecraft, head into a village and be prepared to make a trade, ideally with compasses and emeralds. Villager maps, also known as explorer maps, can be bought at the most affordable price from a cartographer of Journeyman-level status, In some cases, villager maps can be bought for as little as 12 emeralds and a compass. Emeralds can be found throughout Minecraft through mining and smelting emerald ore. Meanwhile, compasses may be crafted with 4 iron ingots and a single Redstone dust.
Question: How big is a level 4 map in Minecraft?
Answer: Minecraft maps have zoom features of 0, 1, 2, 3, and 4. At the level 4 zoom level, a Minecraft map is 2048 by 2048 blocks. Different zoom levels affect how distinguishable the best features of the world are.
Final Thoughts
Knowing how to make a cartography table from scratch is especially helpful when you want ways to create, clone, and edit maps. I also love the control and navigation options that come from a cartography table.
Of course, that’s not all you can craft in Minecraft. If you want to get the most out of your Minecraft experience, you’ll also want to know how to make a saddle, how to make a lantern, how to make stonecutter and how to make shulker box so you can start exploring and creating to the fullest.